 Working
With Transactions
Working
With Transactions
Working
With Transactions
From left to right, the following options are available for each transaction within TeleTracker Online: Save, Undo, Print, Notes, Help, and *Fax.

 New Transactions:
Select
the appropriate transaction line item so it is highlighted in blue. Click
the Add icon (identified as a
‘paper’ picture symbol) in the upper left-hand corner of the viewer.
New Transactions:
Select
the appropriate transaction line item so it is highlighted in blue. Click
the Add icon (identified as a
‘paper’ picture symbol) in the upper left-hand corner of the viewer.
Open Transactions: Select the appropriate
transaction line item so it is highlighted in blue. Click
the Open
icon (identified as a 'folder' picture with an arrow) in the upper left-hand
corner of the viewer. Once
the Transaction has been modified, click the Save
button (identified as a ‘disk’ picture symbol) in the upper left-hand
corner of the open record. For audit control purposes, TeleTracker Online limits
the fields that can be edited once a record has been saved.
Print Transactions: Select
the appropriate transaction line item so it is highlighted in blue. Click
the Print
icon (identified as a 'printer' picture) in the upper left-hand corner
of the viewer. Based
upon predefined printing Preferences, the transaction will be printed.
You may
also Open the transaction and print from the specific transaction window.
Email Transactions: Select
the appropriate transaction line item so it is highlighted in blue. Click
the Email
icon (identified as an 'envelope' picture) in the upper left-hand corner
of the viewer. This
icon will be active only if the Email Account Information fields are populated
within the User Master File.
Fax Transactions: Look
for this feature in a future TeleTracker Online upgrade!
Void Transactions:
Select
the appropriate transaction line item so it is highlighted in blue.
Click the
Void button (identified as an
‘X’) in the middle of the viewer. Once a transaction within TeleTracker
Online has been voided, it will appear in the viewer in red text.
An opened, voided record will contain a red “VOID” message across the
screen.
Refresh Transactions: Click
the Refresh icon to update the Transaction Viewer with the most recent
transactions.
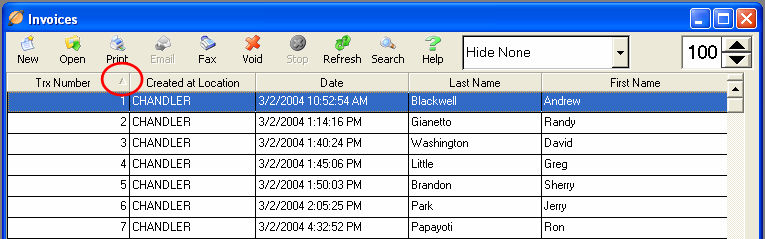
Search Transactions: Click
the Search icon to search for a specific transaction. Your
search can focus on any of the columns within the Transaction Viewer.
The column
you are searching is identified by a triangle located on the right side
of the column header. In
the picture above, the triangle is circled in red. You
can see that the Trx Number column is the focus of the Search function.
If
you wish to search the Last Name column, click the Last Name column header.
The triangle
will then populate in the Last Name column header, identifying the focus
of the search.
The triangle also identifies the sort order of the Transaction Viewer. When looking at the picture above, clicking the Trx Number column header will cause the triangle to point down, sorting the transaction in a descending order. This functionality applies to all columns.
Help: Click
the Help icon to load the TeleTracker Online Help program.
You will find detailed information at the bottom of each transaction within TeleTracker Online. These details include the name of the user who created the transaction and when it was created, whether or not a transaction has been modified, the name of the user who modified the transaction, and when the transaction was modified.
These features provide superior data management.
*Please note: The Fax features is still in development and not yet available.
