 Inventory Adjustment
Inventory Adjustment
Inventory Adjustment
Inbound Inventory Adjustments are used to place items into your inventory without having to create a Purchase Order. Inbound Inventory Adjustments are often used to bring initial inventory into your TeleTracker Online database.
To access Inventory Adjustments from the menu bar of the main TeleTracker Online screen, click Transactions > Inventory Adjustments. To create a new Inventory Adjustment, click on the New button located on the toolbar. To open an existing Inventory Adjustment, select the Transaction from the Inventory Adjustment list and click the Open button.

IMPORTANT: When creating an Inbound Inventory Adjustment, you must be logged into the location that the product(s) will be adjusted IN to!!!

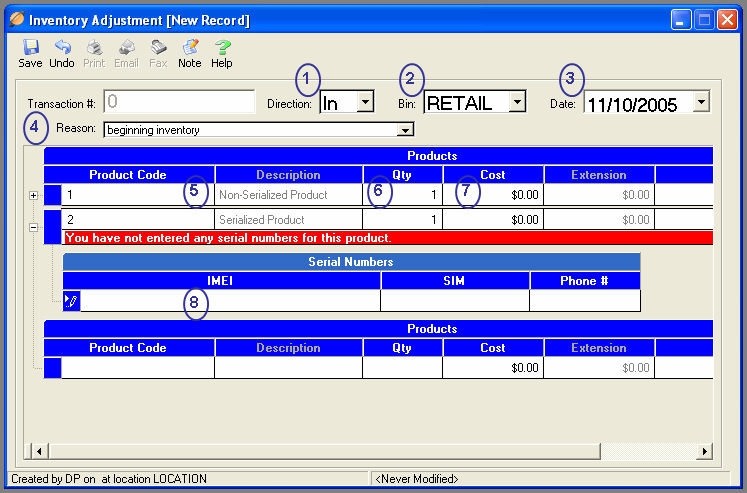
Inventory Adjustment - Inbound
All items marked in RED are required fields and must be populated before the Adjustment can be saved.
 (1)
Select the appropriate Direction
for the Inventory Adjustment. Select
IN to place inventory into a BIN.
(1)
Select the appropriate Direction
for the Inventory Adjustment. Select
IN to place inventory into a BIN.
(2) Select
the appropriate BIN in which you will be working with. When
creating an Inventory Adjustment IN, select the BIN in which the inventory
will be place into.
(3) The Date
will default to the current date. With
the appropriate security level, this date can be modified.
(4) Select
an appropriate Reason from the drop-down list.
Reasons
enable the ability to track why specific transactions are occurring. Visit
the Reasons Help Page for information
on setup and configuration.
(5) Place
a product onto the Inventory Adjustment by entering the product code into
the Product Code field.
Enter the Product Code by scanning the product barcode with a hand held scanner, typing the code manually, or performing a lookup and choosing from existing products. To perform a lookup, click on the lookup button in the right corner of the Product Code field.
(6) When
adjusting serialized products, a sub-menu will appear prompting you to
enter the product’s serial numbers. You may enter serial numbers
either by scanning the barcode with a hand held scanner or by manually
entering the values. The Inventory Adjustment cannot be saved unless
all serial numbers are entered.
(7) Enter
the Qty (quantity) of the product
being placed on the Inventory Adjustment. TeleTracker
Online will automatically default the quantity field to
one (1). You may change the quantity by either using the scrollbar
on the right-hand side of the Qty field or entering the desired quantity.
(8) TeleTracker Online automatically
populates the Unit Cost field
with the last cost placed on an adjustment for the respective product.
You may edit the cost of the product being adjusted into inventory by
clicking into the Unit Cost field and entering the desired cost.
With the proper security level, you may return to an existing Inventory
Adjustment and modify the Unit Cost field. This
modification will filter down to all of the transactions and update the
cost of the product.
To adjust additional products, proceed to the next product code field and repeat the steps above.
To save the Inventory Adjustment, click the
 button located on the toolbar.
Inventory Adjustment OUT -- Inventory Adjustment IN