 Purchase Order
 Purchase Order
To access Purchase Orders from the menu bar of the main TeleTracker Online screen, click Transactions, then Purchase Orders. To create a new Purchase Order, click on the New button located on the toolbar. To open an existing Purchase Order, select the Transaction from the Purchase Order list and click the Open button.
You may also click the  icon
on the TeleTracker Online toolbar to create a new Purchase Order.
icon
on the TeleTracker Online toolbar to create a new Purchase Order.

IMPORTANT: When creating a new Purchase Order, you must be logged into the location that the products will be received IN to !!!
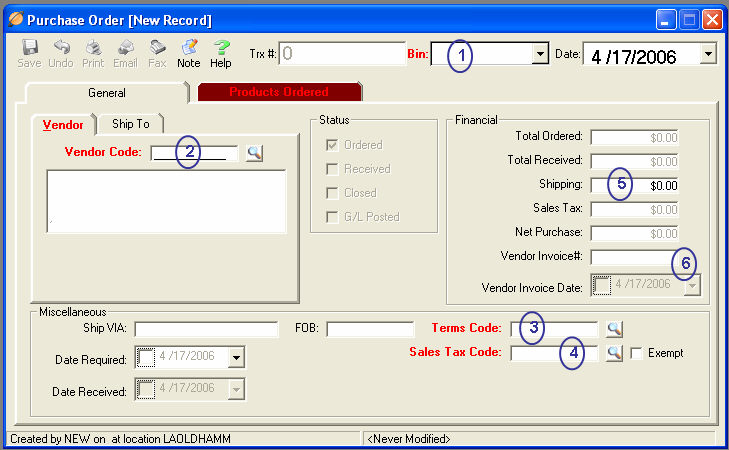
All items marked in RED are required fields and must be populated before the Purchase Order can be saved.
 (1)
Select the appropriate Bin in which you wish to place the items
on the Purchase Order.
(1)
Select the appropriate Bin in which you wish to place the items
on the Purchase Order.
(2)
Enter the Vendor Code.
To perform a lookup of available Vendors, click on the lookup button to
the right of the Vendor Code field. You may search by any of the
available columns. Highlight
your choice and either double-click or hit the <Enter> key.
Once your selection has been made, TeleTracker
Online will automatically populate the Vendor Code field and the
Vendor’s corresponding data into the information box.
(3) Select
the appropriate Terms Code for this Purchase Order and Vendor. To
perform a lookup of available Term Codes, click on the lookup button to
the right of the Terms Code field. Highlight
your choice and either double-click or hit the Enter key.
(4) Select
the appropriate Sales Tax Code for this Purchase Order. To perform
a lookup of available Sales Tax Codes, click on the lookup button to the
right of the Sales Tax Code field. Highlight your choice and either
double-click or hit the Enter key. If Sales Tax does not apply to
the Vendor, simply click on the Exempt
checkbox to the right of the Sales Tax Code field.
(5) Enter
any shipping costs into the Shipping
field under the Financial section.
(6) Enter
the Vendor Invoice # and select
a Vendor Invoice Date only
after the Purchase Order has been received and all changes, including
product costs and shipping, have been made.
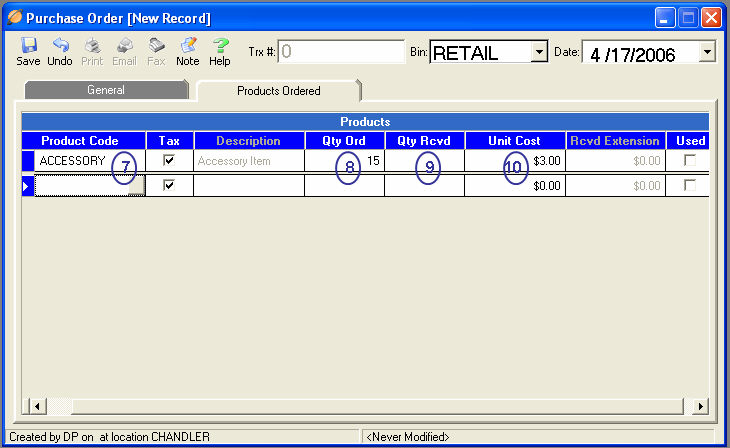
(7)
Enter the Product Code
you wish to order. You
may enter the Product Code either by scanning the item with a barcode
gun, typing it in manually, or performing a lookup and choosing from existing
products. To perform a lookup, click on the lookup button in the
Product Code field. Highlight
your choice and either double-click or hit the Enter key. TeleTracker Online will automatically
populate the Product’s corresponding data as defined in the Product’s
Master File.
If you need to create a new product for the Purchase Order, you may do so from the Product Lookup screen. After the product has been created and saved, TeleTracker Online will automatically populate the new Product’s corresponding data into the Purchase Order.
(8)
Enter
the Qty Ord (Quantity Ordered)
of the product being ordered. TeleTracker
Online will automatically default the quantity field to
one (1). However, you may change the quantity by either using the scrollbar
on the right-hand side of the Qty Ord field or by entering the desired
quantity in the Qty Ord field.
(9) In
most cases, you will 'receive' your ordered products into TeleTracker
Online when they physically arrive to your store or warehouse. For
this case, leave the Qty Rcvd blank
until the products arrive. Complete
the rest of the Purchase Order and save accordingly. See
the Receiving section below for instructions on receiving your products.
TeleTracker Online will allow you to automatically receive the products you order when you create your purchase order. To do this, enter the Qty Recvd (Quantity Received) amount and save the Purchase Order.
(10) TeleTracker Online automatically
populates the Unit Cost field
with the last cost received for the respective product and vendor. This
field can be edited until the Vendor Invoice # and Vendor
Invoice Date is entered and the received Purchase Order has been saved.
You may enter notes within the Purchase Order by clicking the Note button located on the toolbar. A dialog box will appear allowing you to enter notes. To time-stamp a note entry, simply click the Log Entry button and TeleTracker Online will automatically populate the date and time of the entry, as well as the user entering the notes. Click the OK button when finished.
To save the Purchase Order, click the
 button
located on the toolbar.
button
located on the toolbar.
Purchase Order: Order Products -- Purchase Order: Receive Products