 Store
Transfer IN
Store
Transfer IN Store
Transfer IN
To access Store Transfers from the menu bar of the main TeleTracker Online screen, click Transactions, then Store Transfers. Select the appropriate Store Transfer Transaction type (Store Transfer IN, Store Transfer OUT or Request Store Transfer). To create a new Store Transfer, click the New button located on the toolbar.
You may also click the  icon on the TeleTracker Online toolbar. Select
the appropriate Store Transfer Transaction Type (Store Transfer IN, Store Transfer OUT
or Request Store Transfer).
icon on the TeleTracker Online toolbar. Select
the appropriate Store Transfer Transaction Type (Store Transfer IN, Store Transfer OUT
or Request Store Transfer).

IMPORTANT: When creating an Inbound Store Transfer, you must be logged into the location that the product(s) will be transferred IN to !!!
Store Transfer- Inbound
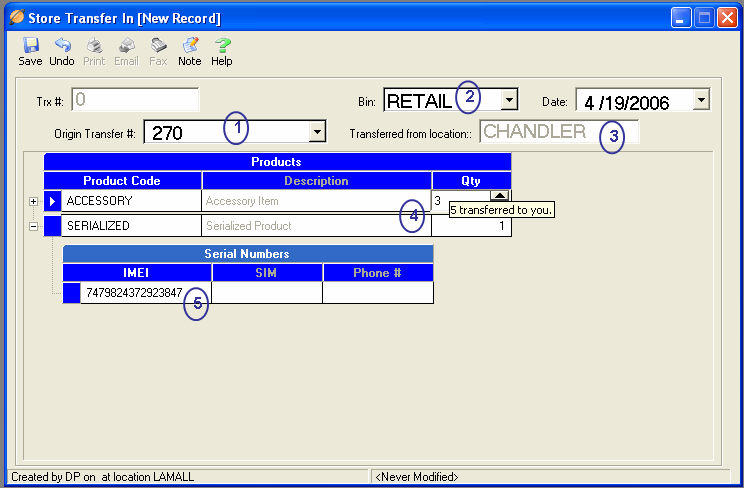
 (1) Select
the appropriate Store Transfer Out transaction # that you would like to
receive into inventory. The
Origin Transfer # drop-down list will only show Store Transfers that have
been sent the location you are currently logged into.
(1) Select
the appropriate Store Transfer Out transaction # that you would like to
receive into inventory. The
Origin Transfer # drop-down list will only show Store Transfers that have
been sent the location you are currently logged into.
(2) Select
the appropriate Bin for which you would like the product(s) to be placed
in.
(3) The
Transferred from location will populate based on the Origin Transfer Number.
(4) Enter
the Qty (Quantity) of the product being transferred IN
to inventory. You may change the quantity by either using the scrollbar
on the right-hand side of the Qty field or by manually entering the desired
quantity.
You can determine how many products were transferred to you by holding your mouse stationary over the Qty field.
It is recommended that you enter the quantity of products that you physically receive from the sending location. In the example above, only 3 of 5 ACCESSORY products were received from the sending location. You will be given the opportunity to leave this Store Transfer open and receive the remaining products at a later time.
(5) When
transferring serialized products, a sub-menu may appear with the product’s
serial numbers. Depending
on the Receiving Method originally
selected in Preferences, one of two scenarios will occur:
If 'Supply Serial Numbers and Quantities' was selected in the Store Transfer Preferences, TeleTracker Online will automatically populate the Store Transfer In with all of the Product Codes, Quantities, and Serial Numbers from the Origin Transfer #.
If 'Supply Product Codes Only' was selected in the Store Transfer Preferences, TeleTracker Online will only automatically populate the Product Codes of the Origin Transfer #. Quantities and Serial Numbers will be entered by the receiving location based upon the physical inventory they receive from the sending location. Serial Numbers entered by the receiving location must match the serial numbers sent by the sending location in order for the Store Transfer IN to be saved. You may enter serial numbers either by scanning them with a barcode scanner or by manually entering the values.
You may enter notes within the Purchase Order by clicking the Note button located on the toolbar. A dialog box will appear allowing you to enter notes. To time-stamp a note entry, simply click the Log Entry button and TeleTracker Online will automatically populate the date and time of the entry, as well as the user entering the notes. Click the OK button when finished.
To Save
the Store Transfer, click on the  button located on the
toolbar.
button located on the
toolbar.
Store Transfer- Partially Received
When you partially receive products sent to you on a Store Transfer IN, you may choose to keep the Store Transfer IN open so you can receive the remaining products at a later time. In the example above, we are receiving 3 of 5 ACCESSORY products. Click the Save button and TeleTracker Online will prompt you with the following message:
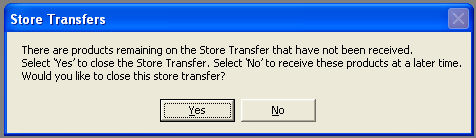
Select Yes to save the Store Transfer IN and prevent additional products to be received at a later time.
Select No to save the Store Transfer IN and have the ability to open the transaction and receive the remaining items. The Store Transfer IN will update with the remaining items to be received. Return to this Store Transfer IN to receive the remaining products by following the steps defined above.
Store Transfer OUT -- Store Transfer IN -- REQUEST Store Transfer