 Creating
an Invoice
Creating
an Invoice Creating
an Invoice
PAYMENTS

Once you have selected and completed each product line on the Products Sold TAB, click back to the General TAB.
 (26) Locate
the Totals section on the right
side of the General TAB. The
various fields within the Totals section will have been automatically
updated, referencing the products on the Products Sold TAB.
(26) Locate
the Totals section on the right
side of the General TAB. The
various fields within the Totals section will have been automatically
updated, referencing the products on the Products Sold TAB.
(27) The Adjustments
button is an administrative function used to modify the overall invoice
amount.
(28) To place
a payment on the invoice, click the Payments
button.

All items marked in RED are required fields and must be populated before the Invoice can be saved.

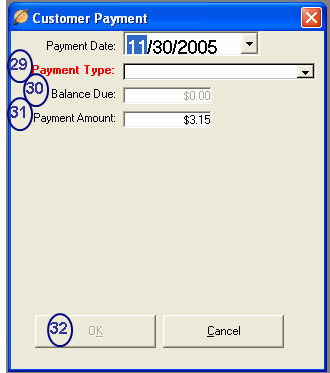
(29) Select
the Payment Type by clicking on
the arrow to the right of the Payment Type field. Choose from the
following six (6) different payment types:
Cash: Enter the Amount of the customer’s payment. TeleTracker Online will automatically display the invoice’s outstanding balance and update it once the payment amount has been entered. Click the OK button when finished.
Check: Enter the Amount of the customer’s payment, Check Number, and Bank Code. TeleTracker Online will automatically display the invoice’s outstanding balance and update it once the payment information has been entered. Click the OK button when finished.
Credit Card: There are various methods of applying a credit card payment onto a TeleTracker Online invoice.
a) When utilizing an external credit card processing machine, enter the Amount of the customer’s payment, their credit Card Number, Expiration Date, and Approval Code. TeleTracker Online will automatically display the invoice’s outstanding balance and update it once the payment information has been entered. Click the OK button when finished.
b) When utilizing TeleTracker Online’s built-in credit card processing feature, enter the Amount of the customer’s payment, and simply click on the Swipe Card button. Once the card has been swiped, the remaining fields will automatically populate. Click the OK button when finished.
c) When utilizing TeleTracker Online’s built-in credit card processing feature and the customer’s card is unreadable or your keyboard does not have a built-in credit card swipe, enter the Amount of the customer’s payment, their Credit Card Number, Expiration Date, and click the Manual Authorization button. Once TeleTracker Online provides you with an approval code, hit the OK button when finished.
Debit Card: The Debit Card payment option within TeleTracker Online is not yet functional. However, when available, you will be able to accept Debit Card payments at the point-of-sale by selecting this payment option. This feature will be available in a future upgrade.
Gift Certificate: The Gift Certificate payment option within TeleTracker Online is not yet functional. However, when available, you will be able to accept Gift Certificate payments at the point-of-sale by selecting this payment option. This feature will be available in a future upgrade.
Store Credit: Enter the Amount of the customer’s payment. TeleTracker Online will automatically display the invoice’s outstanding balance and update it once the payment amount has been entered. Click the OK button when finished.
(30) The
Balance Due
from the customer will be reflected in this field. This
field will update when an amount is entered into the Payment Amount field.
(31) Enter
the amount being paid by the customer in the Payment
Amount field.
(32) Click
OK to continue with the Payment

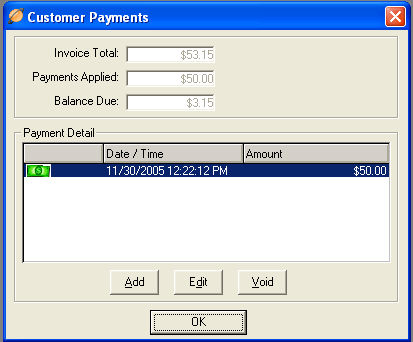
The customer payment will be listed in the Payment Detail Window. You may add an additional payments by clicking the Add button. Click OK when all appropriate payments are entered.
Click on the Save
 icon to save your invoice.
Once the invoice is saved, any change due to the customer will be displayed. If there is a cash drawer installed on the workstation, the cash drawer will open and the appropriate change can be given. Once the customer has been given their change, click the OK button.
If your Preferences are set to automatically print after saving, when applicable, the disclaimer screen will appear and prompt you to choose disclaimers to appear on the invoice. You may choose to print all of the available disclaimers, a single disclaimer, or any combination of disclaimers. Once your disclaimers have been chosen, hit the <OK> button to print your invoice. If you did not set your Preferences to automatically print after saving, simply click on the Print icon in the upper left-hand corner of the screen and follow the same steps.

General Step 1 -- Products Sold Step 2 -- Activation Step 3 -- Payments Step 4