 Creating an Invoice
 Creating an Invoice
PRODUCTS SOLD

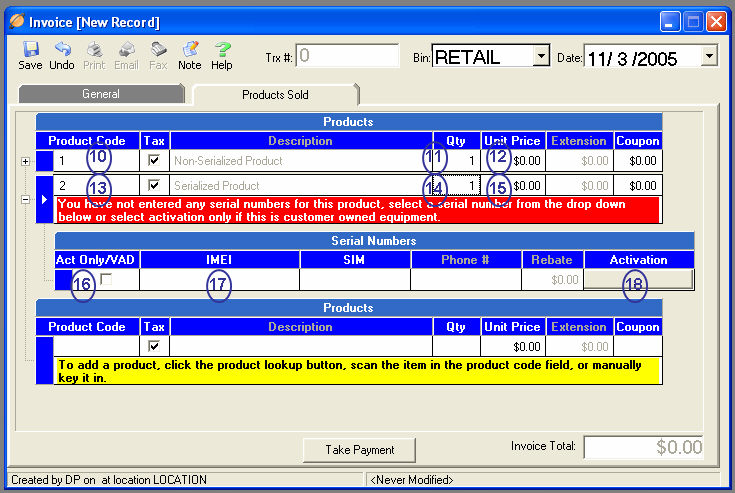
 (10) Enter
the Product Code into the Product Code
field by scanning the product barcode with a handheld barcode scanner.
You may also type the product SKU into the product code field or perform
a lookup for the product by clicking the grey box on the right-side of
the product code field. TeleTracker
Online will automatically populate the product’s corresponding
information as defined in the Product Master File.
(10) Enter
the Product Code into the Product Code
field by scanning the product barcode with a handheld barcode scanner.
You may also type the product SKU into the product code field or perform
a lookup for the product by clicking the grey box on the right-side of
the product code field. TeleTracker
Online will automatically populate the product’s corresponding
information as defined in the Product Master File.
(11) Enter
the Qty (quantity) of the product
being sold. TeleTracker
Online will automatically default the quantity field to
one (1). However, you may change the quantity by either using the scrollbar
on the right hand side of the Qty field or typing your desired quantity
in the Qty field.
(12) Assign
the appropriate Unit Price to
the product. If
the product master file is configured with a default unit price, the unit
price field will automatically populate. Depending
on your user security level, you may or may not be able to modify the
unit price. If
you desire to change the unit price, click into the unit price field and
enter the appropriate amount.
Serialized Products
(13) Enter
the Product Code into the Product Code
field by scanning the product barcode with a handheld barcode scanner.
You may also type the product SKU into the product code field or perform
a lookup for the product by clicking the grey box on the right-side of
the product code field. TeleTracker
Online will automatically populate the product’s corresponding
information as defined in the Product Master File.
(14)
Enter the Qty (quantity)
of the product being sold. TeleTracker
Online will automatically default the quantity field to
one (1). However, you may change the quantity by either using the scrollbar
on the right hand side of the Qty field or typing your desired quantity
in the Qty field.
(15) Assign the appropriate
Unit Price
to the product. If
the product master file is configured with a default unit price, the unit
price field will automatically populate. Depending
on your user security level, you may or may not be able to modify the
unit price. If
you desire to change the unit price, click into the unit price field and
enter the appropriate amount.
(16) Place a checkmark
in the Act Only/VAD when activating customer owned equipment.
(17) Select the appropriate
Serial Number.
If a serial
number has not been entered you will see the following message: “You
have not entered any serial numbers for this product...” In
order to complete and save the invoice, a serial number must be select
for each serialized product. Enter the product’s serial number by
scanning the serial number barcode with a handheld scanner into the ESN
or IMEI serial number field. If
activating a phone, in most cases the serial number will be the ESN or
IMEI number. To perform a lookup and choose from available serial
numbers, click anywhere within the ESN or IMEI serial number field. Click
the drop-down arrow to the right of the field and select the appropriate
serial number.
When selling items that are can be activated, the user will be prompted with "This item has not been activated...” beneath the serial number sub-menu.

Click
on the Activation Button to activate an item. Proceed
to Step
3
If the invoice contains only items that are not being
activated, continue with Taking Payment.
Proceed
to Step
4
General Step 1 -- Products Sold Step 2 -- Activation Step 3 -- Payments Step 4