 Creating an Invoice
 Creating an Invoice
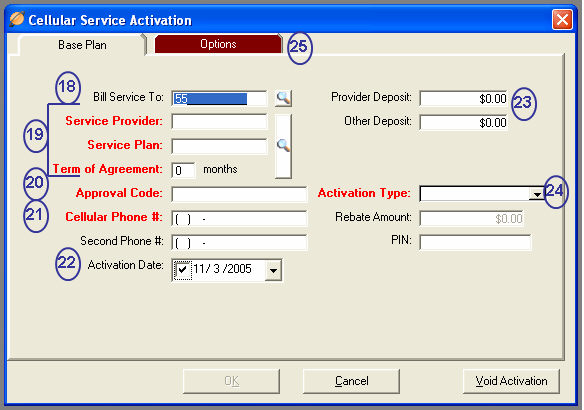
ACTIVATION

All items marked in RED are required fields and must be populated before the Invoice can be saved.

 (18)
Enter the Bill Service To
customer code. TeleTracker
Online will automatically populate this field with the
Sold To customer code identified
in the General TAB of the invoice. However, you may change this
code as desired. To perform a lookup and choose from existing customers,
click on the lookup button to the right of the Customer Code field, highlight
your choice, and either double-click or hit the <Enter> key.
You may also add a new Customers Master File directly from this screen
by clicking on the New icon button in the upper left-hand corner of the
screen and following the prompts within TeleTracker
Online.
(18)
Enter the Bill Service To
customer code. TeleTracker
Online will automatically populate this field with the
Sold To customer code identified
in the General TAB of the invoice. However, you may change this
code as desired. To perform a lookup and choose from existing customers,
click on the lookup button to the right of the Customer Code field, highlight
your choice, and either double-click or hit the <Enter> key.
You may also add a new Customers Master File directly from this screen
by clicking on the New icon button in the upper left-hand corner of the
screen and following the prompts within TeleTracker
Online.
(19) The
next three (3) fields, Service Provider,
Service Plan, and Term
of Agreement will all be populated by performing a lookup.
To begin, click on the tall, vertical lookup button to the right of these
three (3) fields and locate the desired Service Provider. Once you have
located the desired Service Provider, expand the folder by clicking the
plus (+) sign on the left. This will display the available Service
Plans. Locate
the desired plan and expand the folder by clicking the plus (+) sign on
the left. This
will display the available term period(s) for the specified Service Plan.
Double-click the term period. TeleTracker
Online will automatically populate the fields with your corresponding
choice.
(20)
**When
applicable, enter the Service Provider's approval code in the Approval
Code field.
(21)
**When
applicable, enter the telephone number assigned to the Activated Item
in the Cellular Phone # field.
(22) Enter
the desired date in the Activation Date
field. TeleTracker Online
will automatically populate this field with the current date. You
may change this date as desired by clicking on the arrow to the right
of the Activation Date field and utilizing the built-in calendar.
(23) When
applicable, enter the amount of any deposits from the provider in the
Provider Deposit and/or the Other Deposits field.
(24) Enter
the Activation Type. Click
the arrow to the right of the Activation Type to select from the list
of available Activation Types.
(25) Once
the Base Plan TAB of the activation has been completed, click on the Options TAB. A list of the plan’s
available options will be displayed according to the parameters defined
in the Service Providers Master Files. With the exception of mandatory
options, you may select and/or de-select options as desired by simply
clicking on each option’s corresponding check box.

All items marked with ** can be set with a default within the TeleTracker Online Preferences.
Creating these defaults will aid in the speed of the sale and greatly decrease the manual input performed by the salesperson.
Click the OK button to return to the invoice. When appropriate, repeat the steps in the Cellular Service Activation Window to activate another item.
Continue with Taking
Payment. Proceed
to Step
4

General Step 1 -- Products Sold Step 2 -- Activation Step 3 -- Payments Step 4