 Creating an Invoice
 Creating an Invoice
 Walk-In
Customer, Accessory Sale - Cash Payment
Walk-In
Customer, Accessory Sale - Cash Payment
Existing
Customer, Activation Sale - Cash Payment
Selling a Prepaid
Product (EWI Prepaid Program)
To access Invoices from the menu bar of the main TeleTracker Online screen, click Transactions, then Invoice. Click the New icon to create a new Invoice.
You
may also click the Point of Sale
 icon
located on the TeleTracker Online toolbar.
icon
located on the TeleTracker Online toolbar.

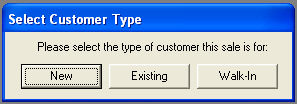
 New: Selecting
New will begin the process of creating a new Customer Master File. You
will be prompted with the Customer Search window. Entering
the Social Security # or Phone # will check the TeleTracker Online database
for any duplicates. If
none are found, TeleTracker Online will search the whitepages. You
will then be asked to complete the Customer Master File. Once
the Customer Master File is saved, you will be taken to the Invoice window.
New: Selecting
New will begin the process of creating a new Customer Master File. You
will be prompted with the Customer Search window. Entering
the Social Security # or Phone # will check the TeleTracker Online database
for any duplicates. If
none are found, TeleTracker Online will search the whitepages. You
will then be asked to complete the Customer Master File. Once
the Customer Master File is saved, you will be taken to the Invoice window.Existing: Selecting
Existing will bring up the Customer Lookup Utility. When
the appropriate customer is selected, you will return to the invoice.
Walk-In:
**Select the Walk-In button
when selling items that do not require detailed customer information.

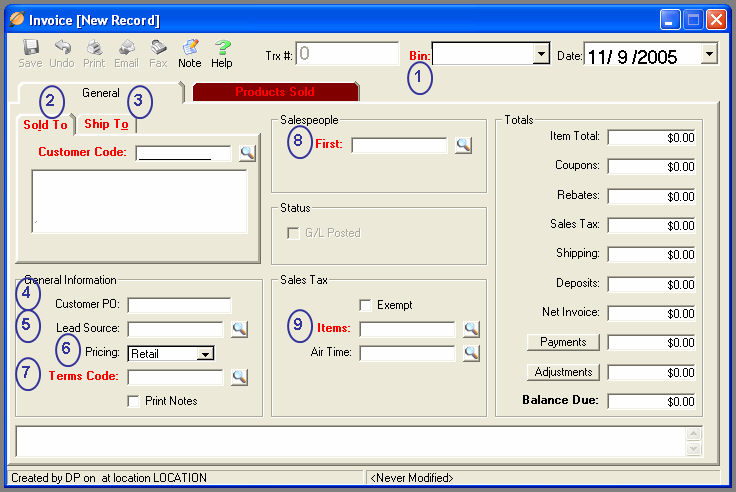
All items marked in RED are required fields and must be populated before the Invoice can be saved.
(1) **Select
the appropriate Bin in order to
sell products from. Bins
are containers that hold inventory. Only
one specific Bin can be selected for an invoice. Visit
the Master Files > Locations help page for more information on Bins.
(2) Enter
the Sold To Customer Code.
To perform a lookup and choose from existing customers, click on the lookup
button to the right of the Customer Code
field. You may also add a new Customers Master File directly from
this screen by clicking on the New icon in the upper left-hand corner
of the screen and following the prompts within TeleTracker
Online.
(3) Enter
the Ship To Customer Code.
TeleTracker Online allows you
to bill items to one customer while shipping them to another. To
perform a lookup and choose from existing customers, click on the lookup
button to the right of the Customer Code
field. You may also add a new Customers Master File directly from
this screen by clicking on the New icon in the upper left-hand corner
of the screen and following the prompts within TeleTracker
Online. By
default, the Sold To Customer Code will populate the Ship To Customer
Code.
(4) If
applicable, enter the Customer PO
(Purchase Order) number.
(5) **Enter
the invoice’s corresponding Lead Source
Code. To perform a lookup and choose from existing Lead Sources,
click on the lookup button to the right of the Lead Source field.
You may also add a new Lead Source Master File directly from this screen
by clicking on the New icon in the upper left-hand corner of the screen
and following the prompts within TeleTracker
Online. Lead
Sources are used to identify each of your business generating sources.
These sources
might include newspaper advertisements, flyers, or referrals.
(6) Select
the appropriate Pricing Level.
TeleTracker
Online will automatically populate the Pricing field with the
default Pricing level identified in the Customers Master File. Retail
and Wholesale Pricing assignments are set within the Product Master File.
(7) **Enter
the invoice’s corresponding Terms
Code. To perform a lookup and choose from existing Terms, click
on the lookup button to the right of the Terms field. Terms
are used to identify the payment conditions for the customer.
(8)
**Enter
the corresponding Salesperson
Code. To perform lookups and choose from existing salespeople, click
the lookup button to the right of the Salespeople field. You may
also add a new Salesperson Master File directly from this screen by clicking
on the New icon in the upper left-hand corner of the screen and following
the prompts within TeleTracker
Online.
(9)
**Enter
the invoice’s corresponding Items Tax
Code. With the exception of non-taxable products, the code
entered in this field will apply to all products sold on the invoice.
To perform a lookup and choose from existing Tax Codes, click the lookup
button to the right of the Items Tax field. You may also add a new
Tax Code Master File directly from this screen by clicking on the New
icon in the upper left-hand corner of the screen and following the prompts
within TeleTracker Online.
All items marked with ** can be set with a default within the TeleTracker Online Preferences.
Creating these defaults will aid in the speed of the sale and greatly decrease the manual input performed by the salesperson.
Click on the Products
Sold TAB to continue to Step
2
General Step 1 -- Products Sold Step 2 -- Activation Step 3 -- Payments Step 4