 Hardware Configuration and Installation
 Hardware Configuration and Installation
APG Series 100 Cash Drawer
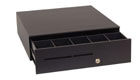

 Attractive design accents your POS
workstation Small footprint, yet features full size till
which takes up less counter space
Attractive design accents your POS
workstation Small footprint, yet features full size till
which takes up less counter space
Large configurable under-till storage
compartment Adjustable media slot divider separates and
organizes different media types
A
variety of interface options to meet your specific needs for controlling
the cash drawer
Closed
and latched drawer status switch Durable,
four function lock improves drawer security
Proven reliability assures low cost of ownership Dual Raceway, steel ball bearing slides provide years of
trouble-free service
Lightweight drawer lowers shipping cost
Weight/Size
16" x 16.7" x 4.9"
19 lbs.
Contact the TeleTracker Online Sales Department @ 877.277.6810 extension 1 for ordering information.
Configuration
Plug the cash drawer directly into the computer.
From the TeleTracker Online Toolbar click VIEW and select WORKSTATION SETTINGS.
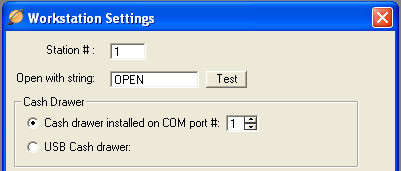
Station #: Identifies a specific Cash Drawer associated with
a specific computer(s). Example:
If you
have 3 computers and 1 cash drawer, all 3 computers will have the same
station number.
Open with string: Place
the text 'OPEN' into this field. This
is the command sent to the cash drawer.

Cash Drawers with a 9-pin Serial Port Connection
Select the Cash drawer installed
on COM port # option. Please
identify the appropriate COM port.
You may test the connection with the cash drawer by clicking the 'Test' button. If the 'Test' button fails to open the cash drawer, then follow the steps below:
1) Verify the Cash Drawer is plugged directly into the computer. The Cash Drawer will not open if it is connected to an peripheral device such as a printer.
2) Verify the power supply for the cash drawer is plugged in. The drawer will not open without a source of external power.
3) On the bottom side of the cash drawer will be a group of small toggle switches. Verify the switches are in the following sequence:
UP - UP - DOWN - UP - UP - DOWN - UP - UP - DOWN - UP
Cash Drawers with a USB Connection
Select
the USB Cash Drawer option in the Workstation
Settings.
The USB Cash Drawer will not require an external power source.

Bar Code Scanner -- Cash Drawer -- Biometric Fingerprint Reader -- Signature Capture Pad
Pole Display -- Receipt Printer -- Magnetic Stripe Reader -- Keyboard