 Exchange
 Exchange
To access the Exchange Transaction from the menu bar of the main TeleTracker Online screen, click Transactions, then Exchange. To create a new Exchange, click on the New button located on the toolbar. To open an existing Exchange, select the Transaction from the Exchange list and click the Open button.

General Information Tab - Return
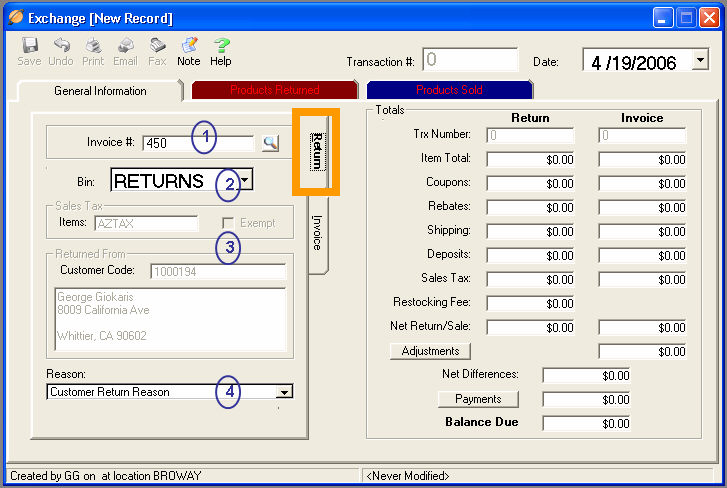
All items marked in RED are required fields and must be populated before the Exchange can be saved.

Select the Invoice Tab within the General Information Tab.
 (1) Enter the
Invoice # of the original TeleTracker
Online Transaction. To perform a lookup of available transactions,
click on the lookup button to the right of the Invoice # field.
(1) Enter the
Invoice # of the original TeleTracker
Online Transaction. To perform a lookup of available transactions,
click on the lookup button to the right of the Invoice # field.
(2) **Select the appropriate Bin to place the returned
items.
(3) Based upon the original invoice selected, the Sales
Tax and Returned From fields will automatically populate.
(4) Select the appropriate Reason for this customer return.
General Information Tab - Invoice
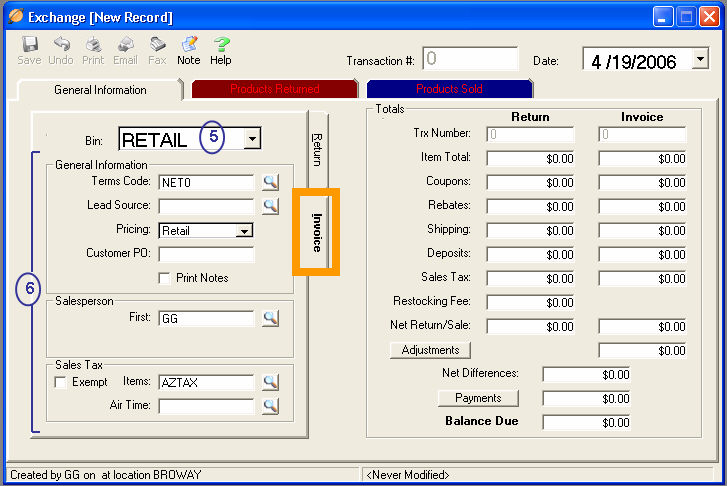
All items marked in RED are required fields and must be populated before the Return can be saved.
Select the Invoice Tab within the General Information Tab.
(5) Select the appropriate Bin in order to sell products
from.
(6) **General
Information, Salesperson and Sales Tax fields function and perform the
same way as found on a regular Invoice. Visit
the Invoice General - Step 1 help
files for detailed information.
All items marked with ** can be set with a default within the TeleTracker Online Preferences.
Creating these defaults will aid in the speed of the sale and greatly decrease the manual input performed by the salesperson. The Exchange preferences will correspond directly with the preferences set for the Invoice and Customer Return.
Click on the Products Returned Tab to continue to Step 2
General Information - Step 1 -- Products Returned - Step 2 -- Products Sold - Step 3 -- Payments - Step 4