 Customers
Customers
Customers Master Files are used to identify your company’s Customers and track their purchases, returns, and accounts receivable history.

To access Customers from the menu bar of the main TeleTracker Online screen, click Master Files, then Customers. To create a new Customer, click on New button located on the toolbar. To open an existing Customer, select the Customer from the Customer Master File list and click the Open button.


 Submit Credit: This
button is used to access the Service Provider Credit Check website. Based
upon the information entered into the customer Master File, TeleTracker
Online will auto-fill the service provider website fields. Click
the Submit Credit button. Select
the appropriate Service Provider. Log
in to the Service Provider credit check website. When
you reach the appropriate customer credit check screen, follow the instructions
and buttons at the top of the screen. To
configure the Submit Credit button, visit the Service
Provider General help page.
Submit Credit: This
button is used to access the Service Provider Credit Check website. Based
upon the information entered into the customer Master File, TeleTracker
Online will auto-fill the service provider website fields. Click
the Submit Credit button. Select
the appropriate Service Provider. Log
in to the Service Provider credit check website. When
you reach the appropriate customer credit check screen, follow the instructions
and buttons at the top of the screen. To
configure the Submit Credit button, visit the Service
Provider General help page.
Code: This
field is the unique account number used to identify each individual customer.
This field
can be set to default as an automatically sequenced or manually entered
number. Please
refer to the Preferences feature within TeleTracker
Online to define the parameters of this feature.
Customer Type: This
field can either be ‘Individual’ or ‘Business’. When
Business is chosen, a company name must be entered.
Status: When
appropriate, apply a status code to the customer. See
the Customer Status Master File help file
for instructions on creating status codes.

Billing TAB
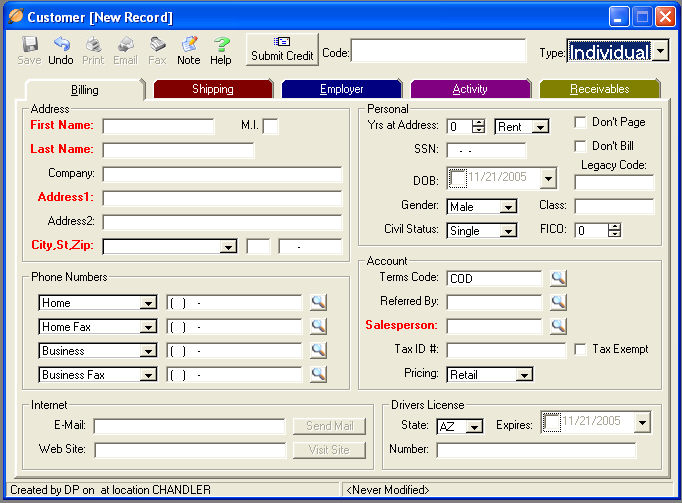
This TAB is designed to house the customer’s detailed contact and billing information.
Address & Phone Numbers & Internet & Personal & Drivers License: Fill
in the appropriate customer fields.
Terms
Code: This
field is used to identify the customer’s individual payment terms. The
information entered in this field automatically becomes the customer’s
default payment term whenever an invoice is generated for the customer.
Please
refer to the Terms Master Files for further information regarding terms.
Pricing: This
field is used to identify the customer’s individual pricing level. The
information entered in this field automatically becomes the customer’s
default pricing whenever an invoice is generated for the customer. Please
refer to the Products Master Files for further information regarding product
pricing.
Salesperson: This
field is used to identify the customer’s original salesperson. This
field can be set to default the original Salesperson to automatically
populate the customer’s future invoices. Please
refer to the Preferences feature within
TeleTracker Online to define the parameters of this feature.

Shipping TAB
This TAB is designed to house the customer’s detailed shipping information.

Employer TAB
This TAB is designed to house the customer’s employment information.

Activity TAB
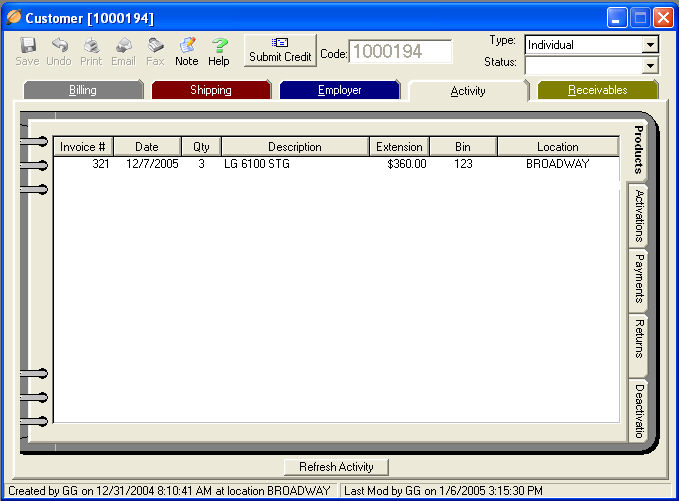
This TAB is designed to house the type of Activities associated with the customer. Within the Activity TAB are several TAB's designed to present different information associated with the selected customer.
Products: This
TAB displays a complete history of each product the customer has purchased.
Activations: This
TAB displays a complete history of each of the customer’s activation(s).
Payments: This
TAB displays a complete history of the customer’s payments.
Returns: This
TAB displays all of the customer’s returns.
Deactivations: This
TAB displays all of the customer’s deactivations.
The detail of each transaction displayed in these tabs can be viewed by double clicking on the transaction.

Receivables TAB
This TAB is designed to provide the customer’s outstanding, and/or past due transactions. The detail of each transaction can be viewed by double clicking on the transaction.
You may also create new invoices, batch payments and/or returns from this tab by simply clicking on the New Invoice, New Batch Payment and New Return buttons located in the lower left-hand corner of this screen.
Credit Limit: Assign
the appropriate Credit Limit to the customer in this field. Note:
In order
for the credit limit to take effect, the appropriate term code must be
applied to the invoice.
Balance: This
field shows the current balance due for the select customer.

-- Activation Types -- Customer Status -- Locations -- Users -- Disclaimers -- Terms -- Lead Sources -- General Ledger -- Reasons --
-- Revenue Departments -- Sales Tax -- Salesperson -- Coupons -- Customers -- Vendor -- Service Provider -- Product --
-- Contact Us --